FlamePOS Daily Operations Manual
1. The Order screen at a glance
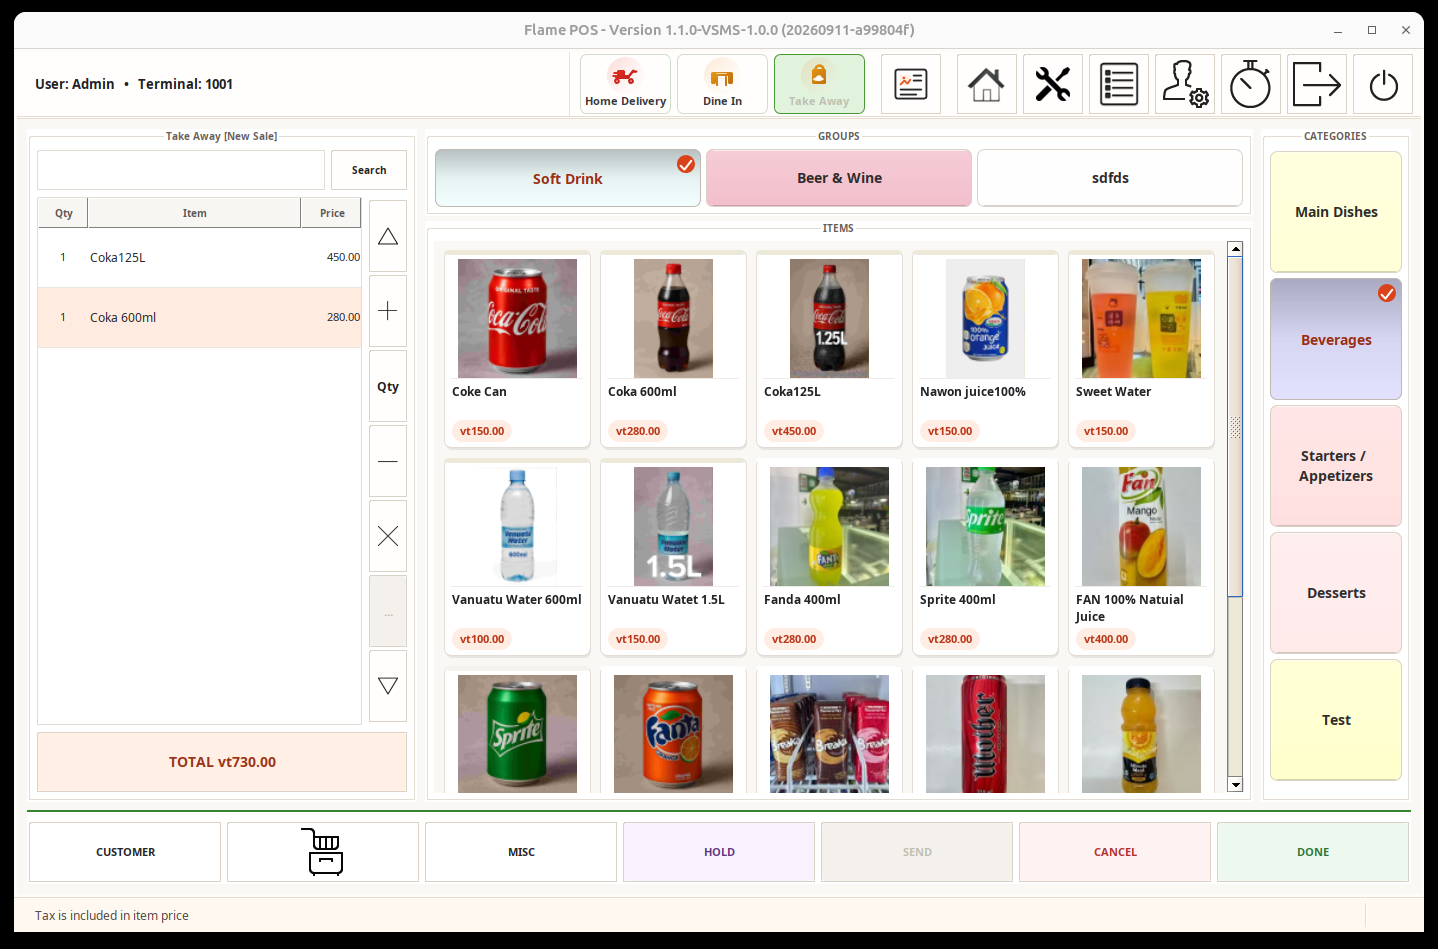 1
2
3
4
5
6
7
8
9
10
11
12
13
14
15
16
17
18
19
20
21
22
23
24
25
26
1
2
3
4
5
6
7
8
9
10
11
12
13
14
15
16
17
18
19
20
21
22
23
24
25
26
1.1 Header and navigation
| Map | Control | What it does |
|---|---|---|
| 1Status | User and Terminal | Shows who is operating the till and which terminal will own the sale. It is information, not a button. |
| 2Mode | Home Delivery | Changes this unpaid order to delivery. Customer and delivery information may be required. |
| 3Mode | Dine In | Changes this unpaid order to table service. Table, guest, and seat controls appear when configured. |
| 4Mode | Take Away | Changes this unpaid order to a counter takeaway sale. Green means it is the current mode. |
| 5Dining room | Table-and-chairs icon | Opens the dining room without leaving the order: seat a customer, open a table’s order, settle it, or close a finished table. |
| 6Home | House icon | Returns to the main dashboard. Finish, hold, or cancel the current work first. |
| 7Maintenance | Wrench icon | Manager-only quick menu maintenance. It reveals pointer/edit/copy/delete tools and the + tiles. Turn it off before selling. |
| 8Orders | List icon | Opens the Orders window to find, inspect, edit, settle, group-settle, close, split, reopen, void/refund, or assign a delivery driver. |
| 9Other | Person and gear icon | Opens Other Functions: Back Office, drawer work, tips, reports, and Kitchen Display. |
| 10Time clock | Clock icon | Clock in/out. A configured driver can also become available or unavailable for delivery. |
| 11Log out | Exit-arrow icon | Ends the current POS login and returns to login. It does not close the shift or cash drawer. |
| 12Shutdown | Power icon | Closes FlamePOS. Permission is required; do this only after finishing the shift. |
1.2 Sale workspace and bottom command bar
| Map | Area/control | What it does |
|---|---|---|
| 13Search | Search box and Search | Scan a barcode or type a name, barcode, or item number. One clear match is added; multiple matches are shown for a choice. |
| 14Ticket | Qty / Item / Price list | The current basket. Select a row before changing its quantity, options, instructions, or deleting it. |
| 15Line tools | ▲, +, Qty, −, ×, …, ▼ | Scroll; add one; enter an exact quantity; subtract one; delete; edit options/modifiers; scroll down. |
| 16Payment | TOTAL vt… | Recalculates the ticket and opens payment. This—not DONE—is the normal route to take money. |
| 17Groups | Group panes | Narrows the centre to a menu group. The red check marks the selected group. |
| 18Items | Product cards/list | Adds a product. A modifier or option window opens first when a required choice is configured. |
| 19Categories | Category panes | Chooses the menu category and its groups. Use PREV/NEXT when there are more categories. |
| 20Customer | CUSTOMER | Selects, creates, or changes the customer attached to this ticket. |
| 21Instruction | Cooking-instruction icon | Adds configured preparation notes to the selected unsent item, for example “very hot” or “no onion.” |
| 22Misc | MISC | Adds an authorised custom item when no normal menu item is suitable; enter the description and price carefully. |
| 23Hold | HOLD | Saves the open ticket and leaves the Order screen so it can be resumed from Orders. |
| 24Send | SEND | Saves and routes new lines to Kitchen or Back Warehouse. It is disabled when the active sales mode has no fulfilment route. |
| 25Cancel | CANCEL | Leaves/cancels the current sale. A confirmation appears when items were already sent for fulfilment. |
| 26Done | DONE | Saves, sends any unsent fulfilment lines, and leaves the Order screen without taking payment. |
2. Start the day or shift
- Start FlamePOS, choose the correct business group if the dashboard asks, and sign in with your own secret key.
- Use the clock icon and choose CLOCK IN if attendance is used.
- If this terminal takes payments, assign the drawer before the first sale. Open Other Functions and press ASSIGN DRAWER; choose the clocked-in cashier and enter the counted opening float. While a drawer is assigned, the same tile reads DRAWER CLOSE.
- Check receipt paper and any Kitchen/Packing printer or Kitchen Display used by the shop.
- Return with BACK, then start the required sales mode from the dashboard.
A terminal configured with no cash drawer can enter and fulfil orders, but it cannot open the payment screen. An equipped terminal also needs a drawer assigned for the shift.
3. Start a sale and choose the correct sales mode
Choose the mode before adding items. You can change an unpaid, open order with the three mode buttons in the header; FlamePOS recalculates prices and taxes. Existing table assignments and already-sent fulfilment lines are kept and are not printed twice. A ticket with payment activity or a closed ticket cannot change mode.
| Sales mode | Use it when | Typical extra information |
|---|---|---|
| Home Delivery / Delivery | The shop delivers to the customer. | Customer, address, delivery date/time, driver; fulfilment may route to Kitchen or Warehouse. |
| Dine In | The guest is served at a table. | Table, guest count, and optional seats; items normally route to Kitchen. |
| Take Away | The customer orders at the counter and collects. | Usually no table; routing depends on the configured mode. |
| Retail | A normal retail counter sale. | The disabled SALES FLOOR tile is an automatic location indicator, not a selection button. |
| Wholesale | Goods are sold through the warehouse/wholesale workflow. | Customer/reference, possible minimum order, Back Warehouse fulfilment. |
The visible three modes depend on the business group. A green mode is selected; a pale/disabled mode is unavailable for that business group or ticket state.
4. Add products and correct the ticket
- Choose a Category, then a Group, then press the product card.
- Alternatively, scan its barcode or type part of its name/code in Search. Use ↑/↓ and Enter to choose when several products match.
- Complete every required modifier group. For example, choose the size and side before the item can be added.
- Check the ticket row, quantity, and price immediately.
| Need to change | Operation |
|---|---|
| Add one | Select the line, then press +. |
| Set an exact quantity | Select the line, press Qty, enter a number greater than zero, and confirm. |
| Subtract one | Select the line, then press −. |
| Remove the line | Select it, then press ×. Printed fulfilment items may require permission or may be protected. |
| Change options/modifiers | Select the line, press …, change the options, and confirm. |
| Add preparation notes | Select an unsent item, press the cooking-instruction icon, choose one or more notes, then confirm. |
| Add a custom item | Press MISC, enter its description, price, tax and routing as requested, then verify the new line. |
4.1 Product Card Display
Open Other Functions, press Product Card Display, and choose:
- Image + text for products with useful photographs and names.
- Image only for a highly visual menu.
- Text list for compact, two-column panes that show more products per page.
The setting belongs to this terminal and changes the product area immediately; it does not change prices or menu data.
5. Customer, table, delivery, and fulfilment controls
The command bar adapts to the active mode. These extra controls appear only when they apply:
| Control | Related window and operation |
|---|---|
| CUSTOMER | Opens customer search/entry. Select an existing customer or create one, then confirm. Delivery and wholesale modes can require this. |
| DELIVERY INFO | Shows/edits address, pickup/delivery details and any configured delivery charge. |
| TABLE | Opens table selection for Dine In. The selected table number is shown afterward. |
| GUEST | Sets the number of guests for table service. |
| SEAT | Sets the active seat so following lines can be associated with a guest. |
| SALES FLOOR | Retail location indicator. FlamePOS knows it is a Sales Floor order from the selected Retail mode; the grey tile is intentionally not pressed. |
| WAREHOUSE ORDER | Wholesale/warehouse indicator showing the order reference; it is not an action button. |
| SEND TO KITCHEN / BACK WAREHOUSE | Prints or displays only newly routed lines. It saves the ticket but does not take payment and does not open the cash drawer. |
HOLD saves and leaves the ticket open. SEND saves and sends but stays on the ticket. DONE saves, sends, and leaves. Choose based on what must happen next.
6. Four common operation paths
6.1 Takeaway paid in cash
Example: two drinks total vt730. Press TOTAL vt730.00, press EXACT, then CASH. Give the customer the receipt and any change shown.
6.2 Dine-in order sent now and paid later
Use EDIT to return the selected ticket to the Order screen and add dessert. When ready, press the ticket total or use Orders → SETTLE.
6.3 Customer pauses while ordering
HOLD is safer than abandoning the screen: it saves the ticket and makes it easy to resume.
6.4 Retail barcode sale
A unique barcode adds its product automatically. If products share the same barcode, choose the intended product from the list; FlamePOS does not guess.
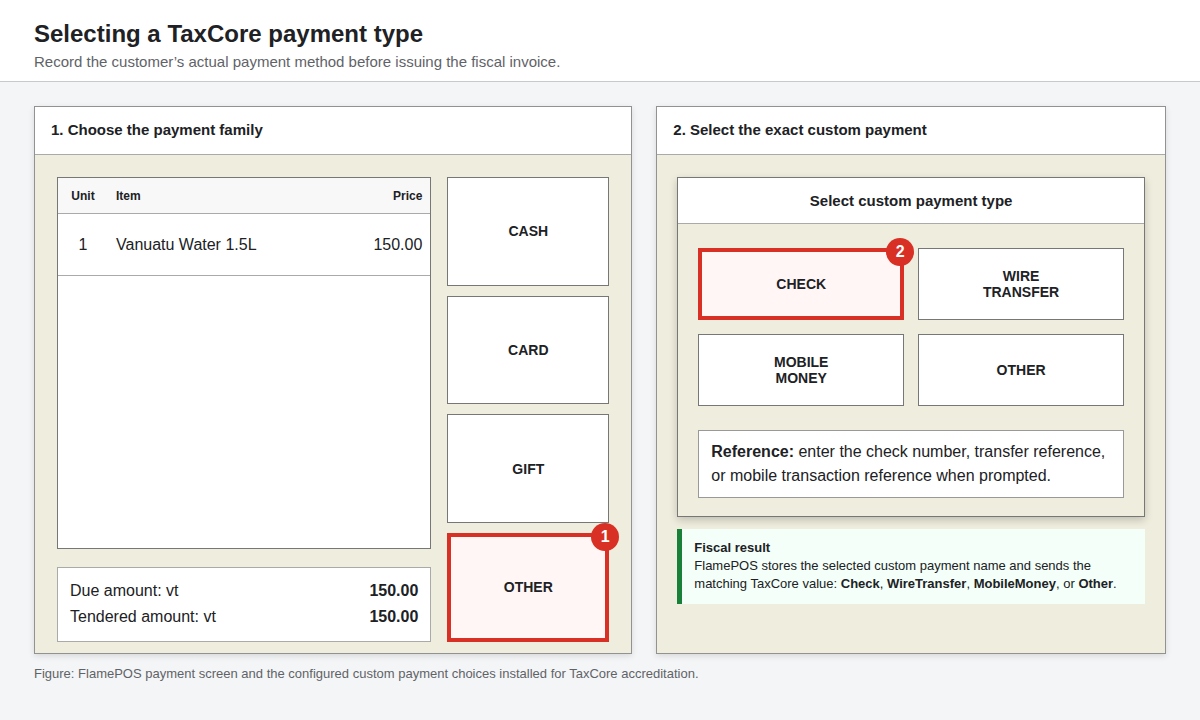
7. Payment screen
| Payment control | Use |
|---|---|
| Due amount | Amount still owed. Check this before accepting money. |
| Tendered amount | Amount the customer is paying now. Type it with the keypad. |
| Blue 1 / 2 / 5 / 10 / 20 / 50 / 100 | Adds common cash denominations to the tendered amount. |
| CLEAR | Clears the tendered amount. |
| EXACT | Sets tendered equal to the current due amount. |
| ROUND | Rounds tendered up to the next whole amount; check the change before confirming. |
| RECEIPT DETAILS | For fiscal use: Normal/Advance/Proforma/Training and optional Buyer ID/TIN or cost centre. Leave Normal sale · No buyer ID for an ordinary customer sale. |
| GRATUITY | Adds a tip/gratuity before payment. |
| DISCOUNT | Applies an authorised ticket or item discount before payment. |
| Prints the open ticket for review. It does not record payment and does not open the cash drawer. | |
| CANCEL | Returns without taking this payment. |
7.1 Choose the payment actually received
| Customer uses | Press | What happens |
|---|---|---|
| Cash | CASH | Records cash. A committed cash payment is the normal payment action that opens the drawer. |
| Credit/debit card | CARD | Uses the configured integrated terminal, or asks for the authorization code from a separate card terminal. |
| Store gift certificate/voucher | GIFT | Asks for the certificate number and face value, then records it as Voucher. |
| Check | OTHER → CHECK | Enter the check number/reference. |
| Bank/wire transfer | OTHER → WIRE TRANSFER | Enter the bank transfer reference after confirming receipt externally. |
| Mobile money | OTHER → MOBILE MONEY | Enter the mobile transaction reference after confirming it with the provider. |
| Another permitted method | OTHER → OTHER | Enter an external reference when available. |
7.2 Card example
- For a vt1,400 ticket, leave Tendered at vt1,400 and press CARD.
- If an integrated terminal is configured, ask the customer to tap/insert/swipe on that terminal and wait for approval. Do not retry while an attempt is unresolved.
- If FlamePOS is configured for an external terminal, charge vt1,400 on the separate machine first. Only after it says Approved, enter its authorization/reference code in FlamePOS and confirm.
- FlamePOS records the card payment and fiscalizes the sale. Keep the provider slip/reference according to shop policy.
7.3 Gift certificate example
The gift number comes from the store-issued certificate, card, voucher, or controlled voucher list—not from the payment window. Check the physical/digital voucher, type that number, and type its face value. This screen records the number and value; it does not issue a new voucher or independently prove that a manually issued number is valid. Follow the store's issue, balance, cancellation, and supervisor policy.
For a vt730 sale paid with a valid vt1,000 certificate, enter the printed number and face value 1000. FlamePOS applies vt730 and calculates vt270 cashback. If the certificate is worth less than the due amount, it becomes a partial payment and the remaining due must be paid another way.
7.4 Split payment
Change Tendered to the first amount and choose its method. When FlamePOS says a partial payment was made, choose to continue, enter the remainder, and choose the second method. Example: on vt1,400, record vt400 Cash and vt1,000 Card. The ticket closes only when Due reaches zero.
8. Orders window
Open the list icon in the header. A normal employee can view OPEN, PAID, and CLOSED lists, use sales-mode filters, and open ORDER INFO. Actions that change money or a ticket remain permission-controlled.
| Control | Operation |
|---|---|
| OPEN / PAID / CLOSED | Filter by ticket state. Open has an amount due or is still active; Paid has no amount due but may still await operational close; Closed is finished. |
| ALL and mode buttons | Show all modes or only Delivery/Dine In/Take Away/Retail/Wholesale as configured. |
| Column icon | Chooses which columns are visible. |
| REFRESH | Reloads the list from the database. |
| PREVIOUS / NEXT | Moves through pages of tickets. |
| ORDER FILTERS | Shows/hides the status and mode filters. |
| Mode tiles at right | Start a new sale in that mode. |
| ORDER INFO | Read-only ticket details. Select one or more rows first; no edit permission is needed. |
| EDIT | Loads one unpaid ticket into the Order screen and closes the Orders window. |
| SETTLE | Opens payment for the selected ticket. Requires an assigned drawer and Settle Ticket permission. |
| GROUP SETTLE | Selects several eligible tickets and pays them together. Bar tabs are excluded. |
| CLOSE | Marks a fully paid ticket closed. A ticket with money due is refused. |
| MORE / LESS | Shows/hides Split Ticket, Reopen Ticket, Void/Refund, Fiscal Refund, and Assign Driver. |
| SPLIT TICKET | Moves selected lines/amounts into separate eligible tickets before payment. |
| REOPEN TICKET | Reopens an eligible closed non-voided ticket by ID. Fiscalized sales remain protected by fiscal rules. |
| VOID / REFUND | Runs the permitted correction path. A fiscal sale uses a referenced fiscal refund, not silent editing. |
| ASSIGN DRIVER | Assigns or changes the driver on a delivery ticket. |
9. Other Functions window
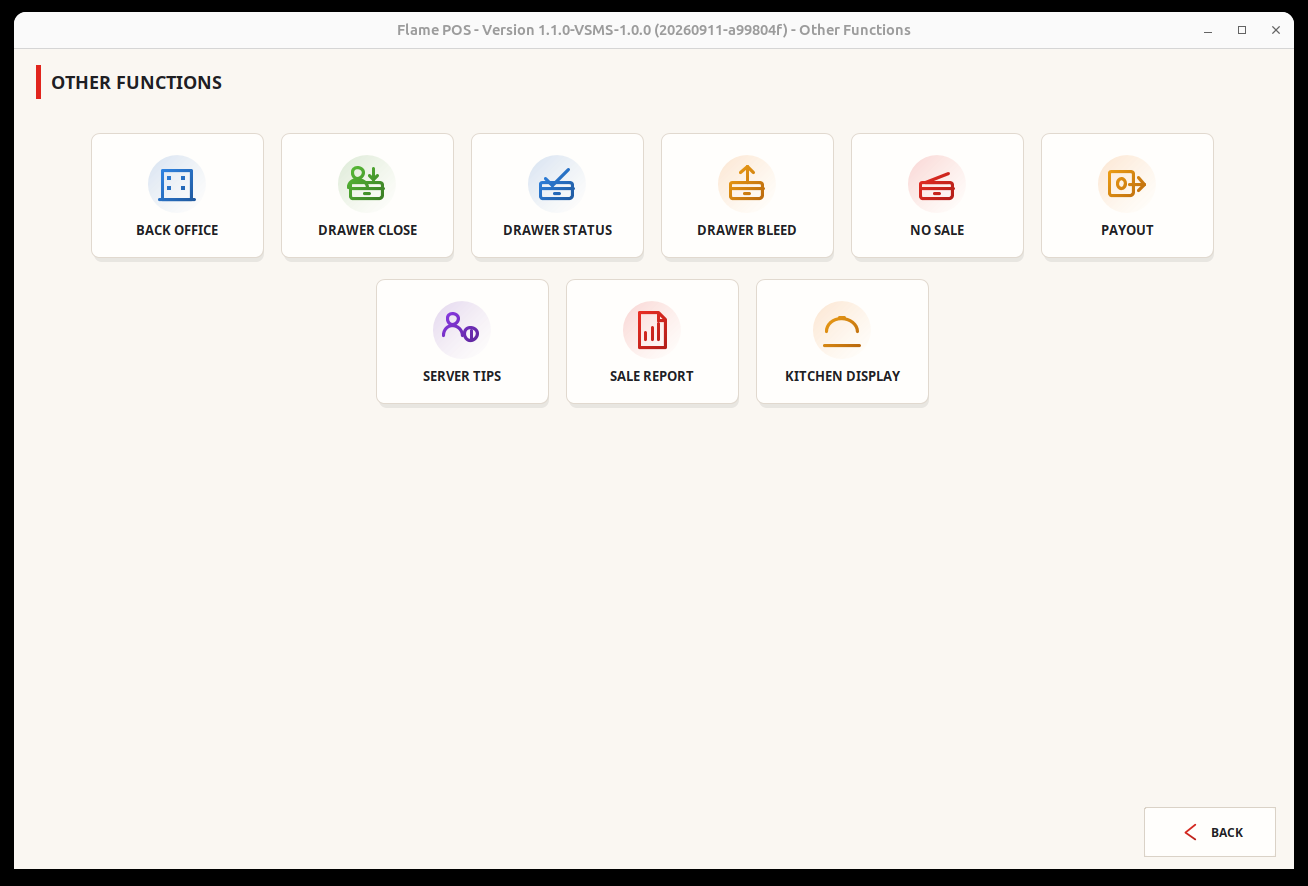
| Tile | When and how to use it |
|---|---|
| BACK OFFICE | Administration, menu, users, configuration, taxes, printers, and reports. Normally manager-only. |
| ASSIGN DRAWER / DRAWER CLOSE | At shift start, assign a clocked-in cashier and counted float. At shift end, confirm close; FlamePOS creates/prints the drawer pull report, unassigns the cashier, and resets the drawer balance. |
| DRAWER STATUS | Shows the current drawer pull/status report without ending the assignment. |
| DRAWER BLEED | Records cash deliberately removed to a safe because the drawer is too full. Physically remove/store the cash under shop procedure, then NEW DRAWER BLEED and enter the exact amount. The record adjusts reconciliation; it cannot move cash by itself. |
| NO SALE | Opens the physical cash drawer without a sale. It does not create a payment or payout record; use only under the shop's permission/audit policy. |
| PAYOUT | Records cash paid from the drawer, such as an approved supplier expense. Enter amount, reason, recipient, and note; FlamePOS reduces expected drawer balance. Cash still has to be physically handed over under shop procedure. |
| SERVER TIPS | Select server and date range, then view the tip cash-out report. |
| SALE REPORT | Opens the focused sales report. It uses the same permission formerly used by the Authorize shortcut. |
| KITCHEN DISPLAY | Opens the live Kitchen/Back-of-house fulfilment queue. |
| PRODUCT CARD DISPLAY | Chooses Image + text, Image only, or Text list for the product cards on this terminal. The setting is made once and belongs to this till. |
| BACK | Closes Other Functions and returns to the previous POS screen. |
10. Related windows: what Confirm, Cancel, and × mean
| Window | Confirm/Save | Cancel or title-bar × |
|---|---|---|
| Product Card Display | Saves the selected display style and refreshes product cards. | Keeps the current display style. |
| Modifier/option selection | Adds the item only after all required choices are complete. | Leaves that new product off the ticket. |
| Cooking Instructions | Adds selected notes to the selected unsent item. | Keeps the item unchanged. |
| Customer/Delivery/Table/Guest/Seat | Attaches the entered operational details to the ticket. | Keeps the earlier details; a required field can prevent continuing. |
| MISC item | Adds the custom line and its entered price/tax details. | Adds no custom line. |
| Payment | A payment method commits only after all required confirmations/provider approval. | Returns without starting a new payment. It does not undo an already committed partial payment. |
| Drawer Bleed/Payout | Creates the cash-control record and changes expected drawer balance. | Creates no new record. |
All normal FlamePOS windows can be closed with the title-bar ×. Prefer the on-screen Cancel, Close, or Back when one is provided because its meaning is clearer. Never close or power off while a card terminal or fiscal request says it is processing.
11. End-of-shift path
- Open Orders and review OPEN and PAID tickets. Settle legitimate unpaid tickets; close eligible paid tickets; leave only work that the next shift is formally taking over.
- Use SALE REPORT and any required fiscal daily report. Reconcile receipts and payment methods.
- Open DRAWER STATUS and count cash under shop policy. Check recorded bleeds and payouts.
- Press DRAWER CLOSE and confirm. Keep the printed drawer pull report.
- Clock out, log out, then use Shutdown only if the terminal is meant to be turned off.
12. Permissions, disabled buttons, and safe recovery
- A pale or disabled button usually means the operation does not apply now or the signed-in user lacks permission. Do not share a manager PIN; ask the authorised person to approve.
- Viewing OPEN/PAID/CLOSED, sales-mode filters, and ORDER INFO is available to normal employees. Editing, settling, splitting, reopening, void/refund, quick maintenance, drawer control, Back Office, and shutdown follow their own permissions.
- If payment fails before approval, read the message and retry only after checking the provider/SDC state. If a card terminal approved but FlamePOS reports a fiscal/network problem, do not charge again; call a supervisor and use the recorded recovery state.
- If printing fails after a committed payment, the sale may still be paid. Check Order Info/fiscal history before any retry, then use an authorised reprint/copy path.
- Closing a window does not reverse a committed payment, submitted fiscal invoice, sent kitchen item, drawer bleed, or payout.
13. Quick route finder
| I need to… | Go to… |
|---|---|
| Start a new order | Dashboard or right side of Orders → sales mode |
| Change an unpaid order from Take Away to Dine In | Order header → Dine In → choose table if prompted |
| Find a product | Order → Search/scan, or Category → Group → Item |
| Add a note to food | Select ticket line → cooking-instruction icon |
| Save and come back later | HOLD → Orders → select OPEN ticket → EDIT |
| Send work to Kitchen/Packing/Warehouse | SEND or DONE; routing is configured by order/item printer groups |
| Take payment now | Order → TOTAL → amount → payment method |
| Pay an existing open ticket | Orders → select ticket → SETTLE |
| See ticket history/details | Orders → select row → ORDER INFO |
| Remove excess cash to the safe | Other Functions → DRAWER BLEED |
| Record an approved cash expense | Other Functions → PAYOUT |
| View daily sales | Other Functions → SALE REPORT |
| End the cashier drawer shift | Other Functions → DRAWER CLOSE |
Dining Room: share and move tables
The icon buttons are Open, Share, Move, Settle and Close. Share seats a separate order at an occupied table. To move a table, choose Move, tap the occupied table, then an empty, unreserved table. All open orders on a shared table move together; other grouped tables stay assigned. Cancel leaves the table assignments unchanged.