FlamePOS User Manual
1. Purpose
This manual explains the daily operating steps for FlamePOS users. It covers login, ticket creation, item entry, payment, fiscal receipt printing, refunds, receipt copies, and basic end-of-shift actions.
2. Login
- Start FlamePOS from the configured application shortcut.
- Wait while FlamePOS retrieves and synchronizes the currently active tax rates from the configured SDC. If synchronization fails, notify the administrator and do not begin fiscal operation.
- Enter the assigned user PIN or credentials.
- Select the correct terminal or drawer if prompted.
- Confirm that the business date, terminal number, and printer status are correct.
Where the login dashboard offers an operating-mode selector, choose Hospitality or Retail / Grocery for the required workflow. This selection does not change fiscal rules.
Users must not share login credentials. Each fiscal invoice should be traceable to the cashier or operator who completed the transaction.
3. Creating a Sale Ticket
- Select the required order type, such as dine-in, takeaway, delivery, or bar tab.
- Select the table, customer, guest count, or order details if required by the business process.
- Select menu groups and PLU items to add them to the ticket, or enter/scan the configured item barcode.
- Choose the options the product asks for. A product that must be sold in a particular form - a pizza that comes in three sizes, a dish that comes with a choice of side - opens its choices as soon as it is pressed, and the ticket does not take it until a choice is made.
- Review the ticket before payment. Confirm item names, quantities, discounts, tax, service charge, delivery charge, total, paid amount, and due amount.
For products that have a Global Trade Item Number (GTIN), the administrator records the GTIN in the item
Barcode / GTIN field. When that item is fiscalized, FlamePOS sends the configured value in the
TaxCore invoice item gtin field. Items without a configured GTIN can still be selected by menu button
or item number according to the business process.
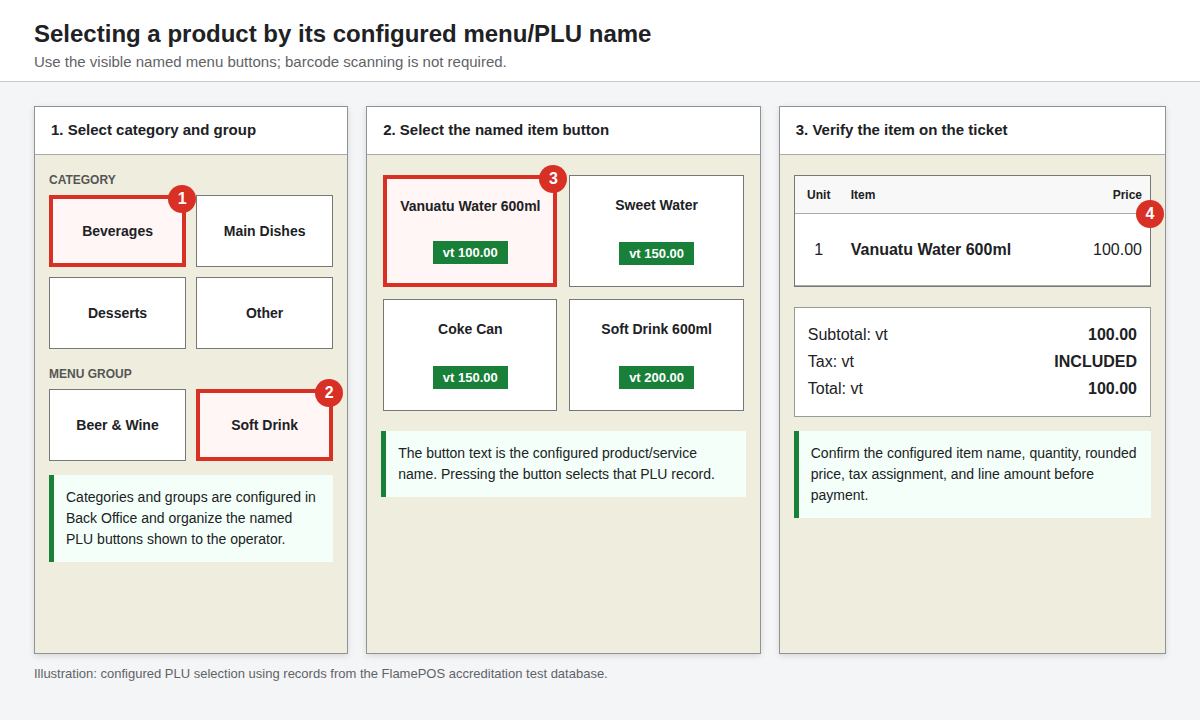
3.1 Selecting a product or service by its configured menu/PLU name
Every visible product or service configured in Back Office is presented to the operator as a named menu item button. The button text is the configured menu/PLU name. A barcode scanner is not required when selecting an item by name.
- Start or open the sale ticket and select the required order type.
- In the category area, select the category containing the item. For example, select Beverages.
- Select the configured menu group. For example, select Soft Drink.
- Review the named item buttons displayed for that group and select the required product or service. For example, select Vanuatu Water 600ml. The visible name comes from the configured PLU/menu item record.
- Complete any quantity, option, or cooking-instruction prompt that appears for the selected item.
- Confirm that the item was added to the ticket with its configured name, quantity, rounded unit price, tax assignment, and line amount.
- Repeat the category, group, and named-item selection steps for any additional products or services.
4. Discounts, Quantity Changes, and Removing Items Before Fiscalization
4.1 Setting a quantity directly
The Qty control in the vertical item toolbar sets the quantity of the selected line in one step, rather than pressing plus repeatedly. Select the line, press Qty, type the number, and confirm. The quantity must be greater than zero; to remove the line entirely, use the delete control described below.
4.2 An offer that is not earning yet
Some offers only take money off once the line has enough of the item on it. An offer
written as "buy 1 and get 1 free" needs two on the line, because there is no free one
until there are two. While the line is short, the ticket shows the offer with what it is
still waiting for beside it - for example
* Buy 1 and get 1 free (needs 2) - and the discount stays at zero. The note
disappears as soon as the line has enough, and the discount appears.
This note is on the operator's screen only. It is not printed on the receipt and is not sent to TaxCore: an offer that took nothing off has nothing to declare.
Discounts may be applied to individual items or to the ticket, depending on user permissions and configured business rules. Supervisory approval may be required for restricted discounts, voids, or price changes.
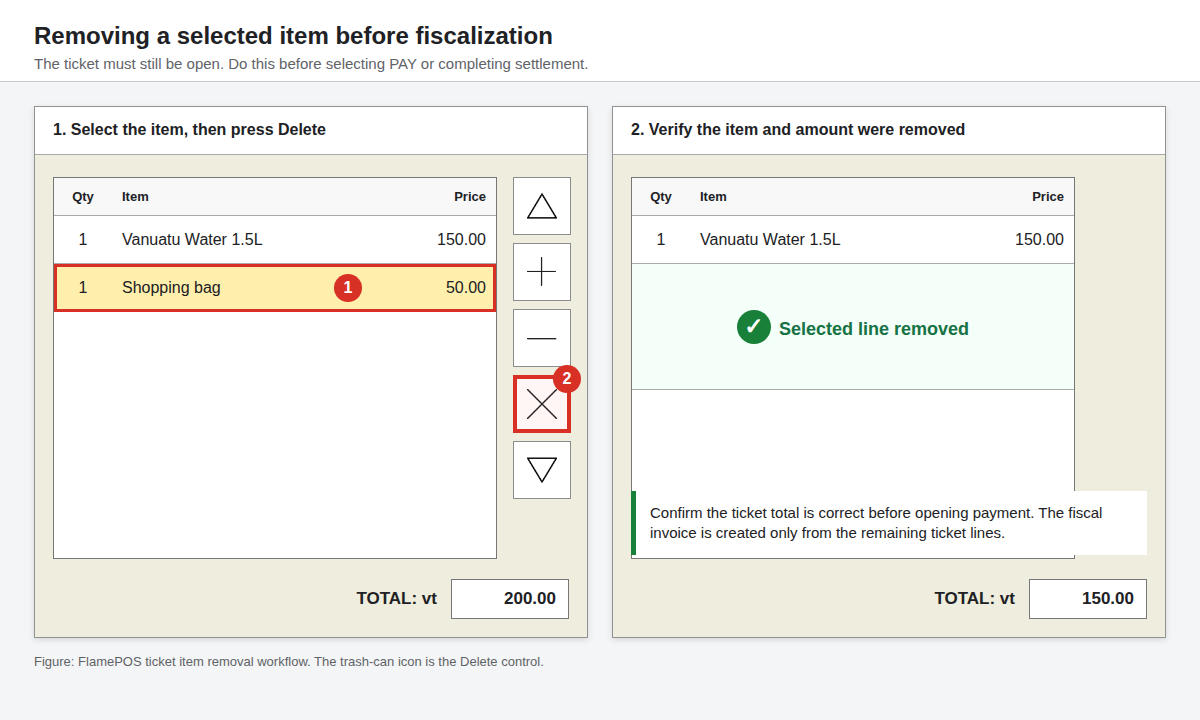
4.3 Removing a selected item before issuing the fiscal invoice
- Keep the ticket open. Do not select PAY or complete settlement.
- In the active ticket list, select the item line that must be removed. The selected line is highlighted.
- Press the Delete control, identified by the trash/delete icon in the vertical item toolbar.
- If the installation requests authorization or a void reason, obtain the required supervisor approval and complete the prompt. A kitchen-printed item can be deleted only when the terminal setting and user permission allow deletion of printed items.
- Verify that the selected line is no longer present and that subtotal, tax, and total amounts were recalculated. To reduce a quantity instead of removing the entire line, select the line and use the minus control.
- Repeat for any other incorrect items. Open payment only after the remaining item list and totals are correct.
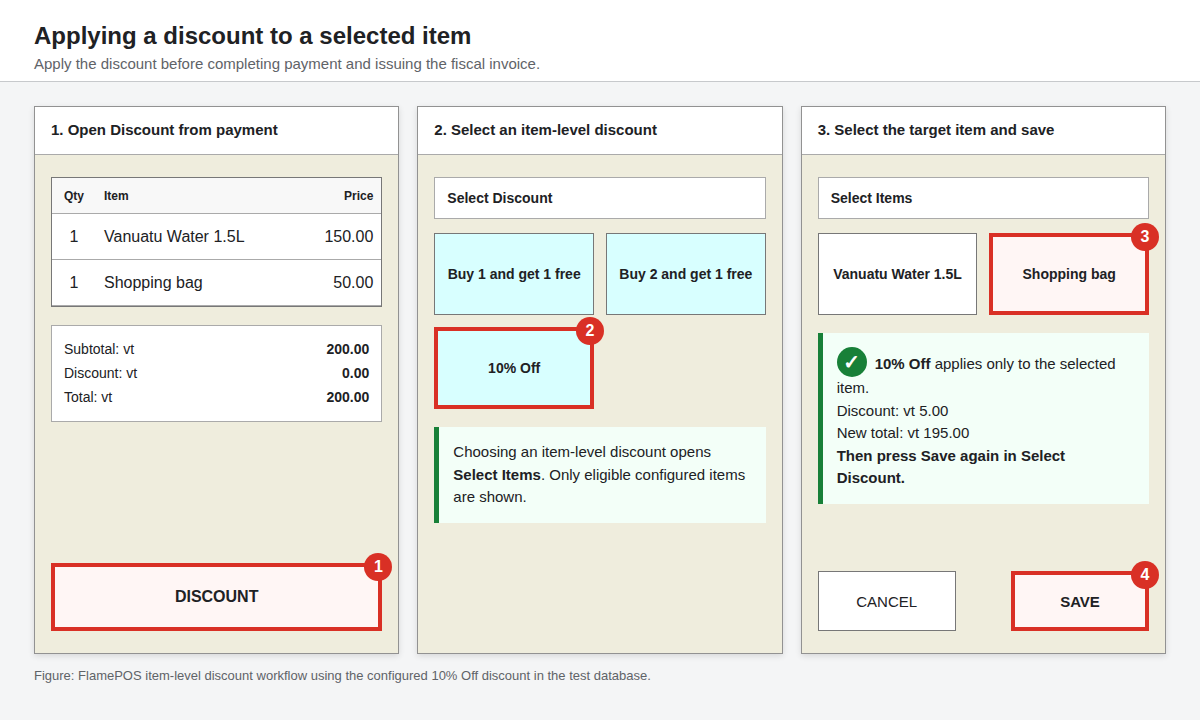
4.4 Applying a discount to selected items before issuing the fiscal invoice
- Keep the ticket open and confirm that all item lines and quantities are correct.
- Select PAY to open the payment screen, but do not complete a payment.
- Select DISCOUNT. The current user must have the Add Discount permission.
- In Select Discount, choose an enabled item-level discount, such as 10% Off. Item-level discounts open the Select Items window.
- In Select Items, select one or more eligible item buttons. Selected items are highlighted. Items that are not eligible under the configured discount rules are not displayed.
- Select SAVE to confirm the selected items. When returned to Select Discount, select SAVE again to apply the discount to the ticket.
- Verify the discount amount and recalculated total on the payment screen before selecting a payment type. Reopen DISCOUNT if the selected item or amount must be changed.
- Complete payment only after the discount and total are correct. FlamePOS includes the discounted item amounts in the fiscal invoice request.
5. Settling Payment
- Open the payment or settlement screen from the active ticket.
- Select the payment type that matches the customer's actual method of payment.
- For card payments without an attached swipe device, use the external/manual authorization flow and enter the authorization code from the separate payment terminal or provider record.
- Enter tendered amount where required.
- Confirm the amount paid and the change or remaining due amount.
- Complete the payment.
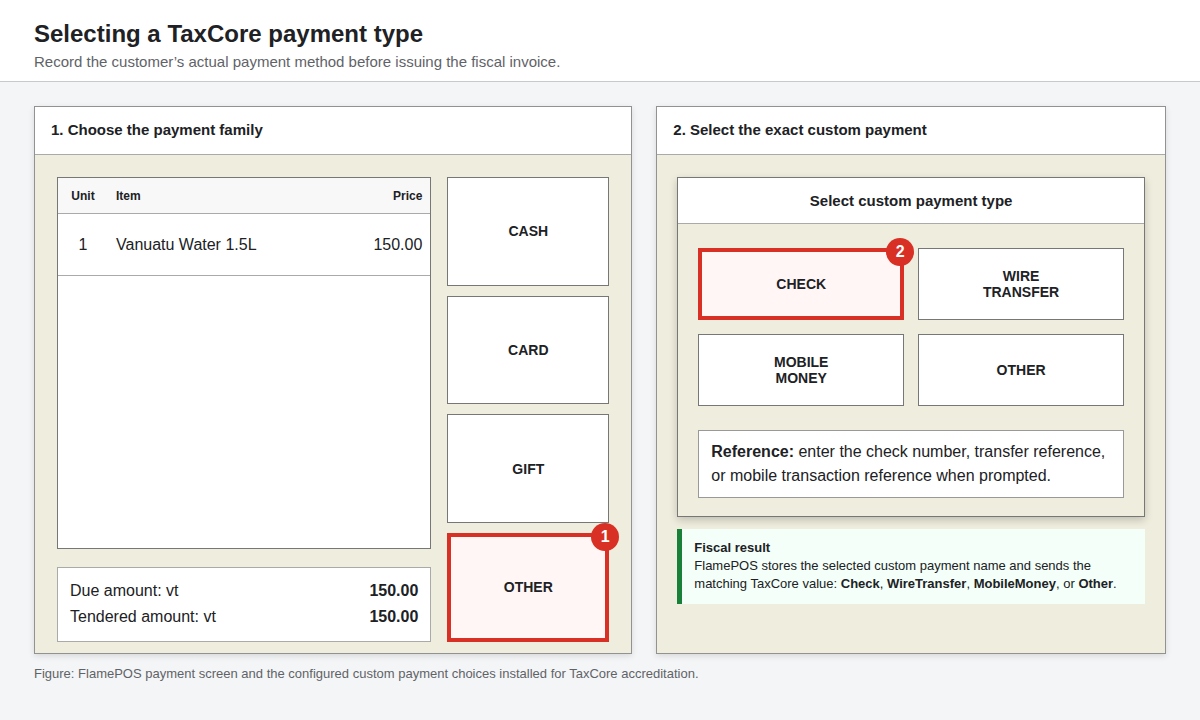
5.1 Selecting every supported TaxCore payment type
| Customer payment method | FlamePOS control | TaxCore payment type |
|---|---|---|
| Cash | CASH | Cash |
| Credit or debit card | CARD | Card |
| Check or cheque | OTHER, then CHECK | Check |
| Wire or bank transfer | OTHER, then WIRE TRANSFER | WireTransfer |
| Gift certificate or voucher | GIFT | Voucher |
| Mobile money | OTHER, then MOBILE MONEY | MobileMoney |
| Any permitted method not listed above | OTHER, then OTHER | Other |
- For Cash, Card, or Gift/Voucher, select the corresponding payment button on the payment screen.
- For Check, Wire Transfer, Mobile Money, or Other, select OTHER. FlamePOS opens Select custom payment type.
- Select the exact custom payment method. For Check, Wire Transfer, and Mobile Money, enter the requested external payment reference and confirm it.
- Review the tendered amount, then complete settlement. FlamePOS records the selected method on the POS
transaction and sends its mapped TaxCore
PaymentTypein the fiscal invoice request.
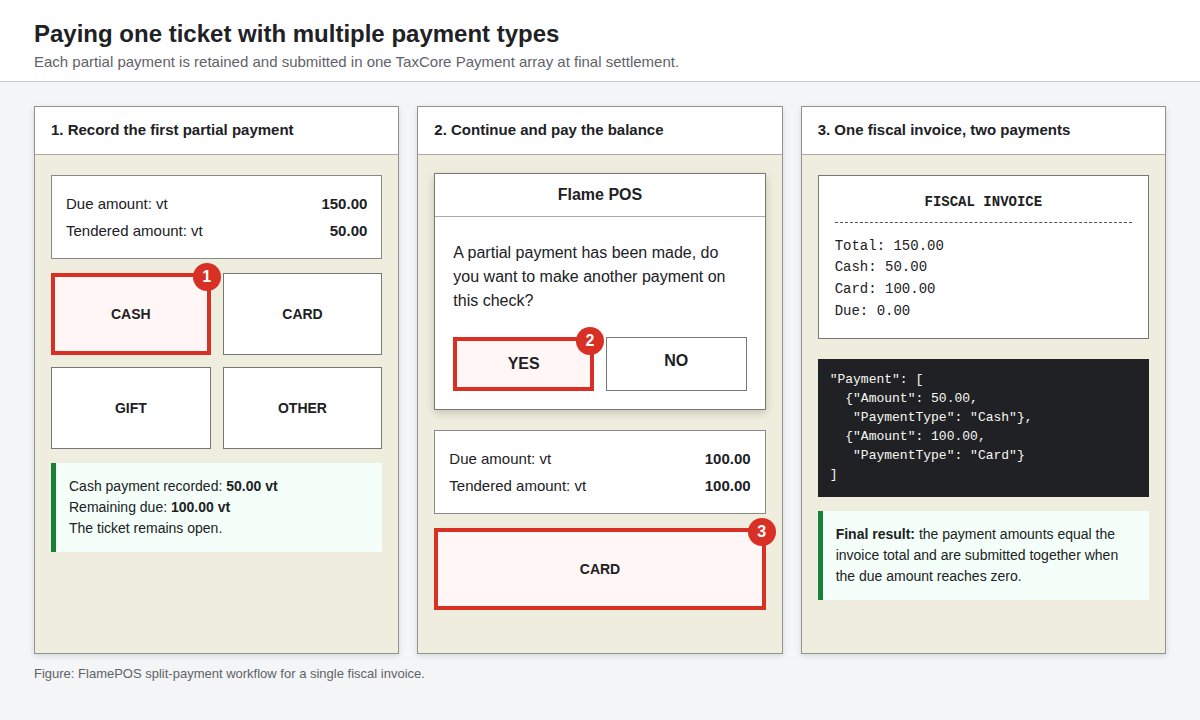
5.2 Paying one ticket with multiple payment types
FlamePOS supports two or more payment types on the same ticket. Each partial payment is recorded separately. The
ticket remains open until the due amount reaches zero, and the final fiscal invoice contains one TaxCore
Payment entry for every payment recorded on that ticket.
- Open the payment screen and note the full due amount.
- Replace the tendered amount with the amount to pay using the first method. For example, on a 150.00 vt ticket enter 50.00, then select CASH.
- After FlamePOS records the partial payment, it displays: A partial payment has been made, do you want to make another payment on this check? Select Yes to continue immediately.
- Confirm that the due amount has been reduced. In the example, the remaining due amount is 100.00 vt.
- Enter the remaining amount and select the second payment method, such as CARD. Additional partial payments can be added in the same way when more than two methods are required.
- When the due amount reaches zero, FlamePOS fiscalizes the sale. The request contains the individual method and amount for every recorded payment; for the example: Cash 50.00 and Card 100.00.
- Verify that the fiscal receipt shows the payment breakdown and that the payment amounts equal the invoice total.
If the transaction is fully paid, FlamePOS submits the sale to the configured SDC. The POS first retrieves the current active tax-rate group from that SDC status service, synchronizes each linked tax category's calculation percentage, and applies those returned values to the ticket items and modifiers. The final fiscal receipt is printed only after synchronization succeeds and the fiscal response is received and stored.
5.3 Daily receipt details and special documents
The payment screen defaults to a Normal Sale without buyer identification. Select RECEIPT DETAILS only when a different fiscal document or buyer identification is required.
- For an identified sale, enable Add buyer identification, enter the Buyer ID/TIN supplied by the customer, and optionally enter the buyer cost center. Complete payment normally.
- For a fully prepaid order that requires an Advance receipt, select Advance payment before completing payment.
- To connect a final Normal Sale to an earlier Advance, Advance Refund, or Proforma, enable the linked-document section and enter the exact SDC invoice number and SDC time returned for that earlier document.
- For Proforma or Training, select the document type and the payment type to show, then select ISSUE NOW. FlamePOS creates and prints the document without posting a real payment or changing the ticket's paid/closed state, stock, drawer balance, or real-sale totals.
- To work with an issued document, open the order's ORDER INFO, then FISCAL DOCUMENTS. Select the exact row before creating a Copy or issuing its corresponding Refund/cancellation. Buyer and reference fields are inherited from that selected source.
5.4 Orders-window fiscal command mapping
When VSMS is active, FlamePOS maps daily commands to fiscal operations:
- SETTLE creates the selected TaxCore Sale.
- FISCAL REFUND creates the matching Refund and prints that signed fiscal response.
- VOID / REFUND on a paid order performs a full fiscal Refund before recording the internal void reason. It does not print an additional legacy refund or void receipt.
- PRINT FISCAL COPY creates a referenced TaxCore Copy.
A fiscalized order cannot be reopened, edited, or split. Refund it and create a new order instead. When VSMS is disabled, the same controls use the original FlamePOS operations and legacy receipt formats.
6. Fiscal Receipt
The administrator configures local, non-fiscal branding in Back Office > Configuration > Business. Fiscal taxpayer and location identification is obtained from the signed SDC response associated with the active TaxCore identity and Developer Location.
The fiscal receipt contains the commercial and fiscal data required for the transaction, including:
- Taxpayer business name and location name returned by the selected SDC.
- For the submitted Headquarters Developer Location, both required identity fields read
Wok & Flame; identical adjacent lines are therefore expected. - Business address and district returned by the selected SDC.
- Terminal and cashier identification.
- POS Number:
1083/1.1.0-VSMS-1.0.0. - Ticket/check number.
- Invoice type and transaction type.
- Item lines, quantities, prices, discounts, tax labels, and totals.
- Item GTIN values where configured for the PLU/menu item.
- Payment information and amount paid.
- Fiscal invoice number, invoice counter, SDC date/time, and verification QR code.
- The title line END OF FISCAL INVOICE below the QR code. The verification URL is retained in the fiscal audit record but is not printed as receipt text.
7. Partially Paid Tickets
If partial payment is allowed by the business configuration, the ticket remains open until the due amount is paid. The operator can reopen the ticket and record another payment, or select Yes at the partial-payment prompt to continue immediately. FlamePOS fiscalizes the sale only when the due amount reaches zero and includes all recorded ticket payments in the final fiscal invoice.
8. Refunds
- Find the original closed ticket.
- Open ORDER INFO, then FISCAL DOCUMENTS.
- Select the exact Sale document and choose REFUND / CANCEL.
- Review the inherited receipt type, Buyer ID, source SDC invoice number, and SDC time.
- Confirm the full-order refund. Fiscal partial refunds are blocked in this screen until item and quantity selection is available.
- Complete the refund.
The refund fiscal invoice references the original fiscal invoice as required by the fiscal system. The refund receipt clearly shows that it is a refund and includes the fiscal response fields returned by the selected SDC.
9. Receipt Copies and Reprints
Receipt copies are available only to authorized users. A copy or reprint creates a TaxCore Copy invoice using the correct transaction type, either Copy / Sale or Copy / Refund. The copy references the invoice being copied, receives its own fiscal invoice number, invoice counter, SDC time, and QR code, and does not change sales or refund totals. The verification URL remains in the stored SDC response and is not printed as receipt text.
10. Voids and Corrections
Voids or corrections before final payment may be performed according to user permissions. After a fiscal invoice has been issued, corrections must follow the approved refund or correction process and preserve the link to the original fiscal invoice.
11. Fiscal Daily Report
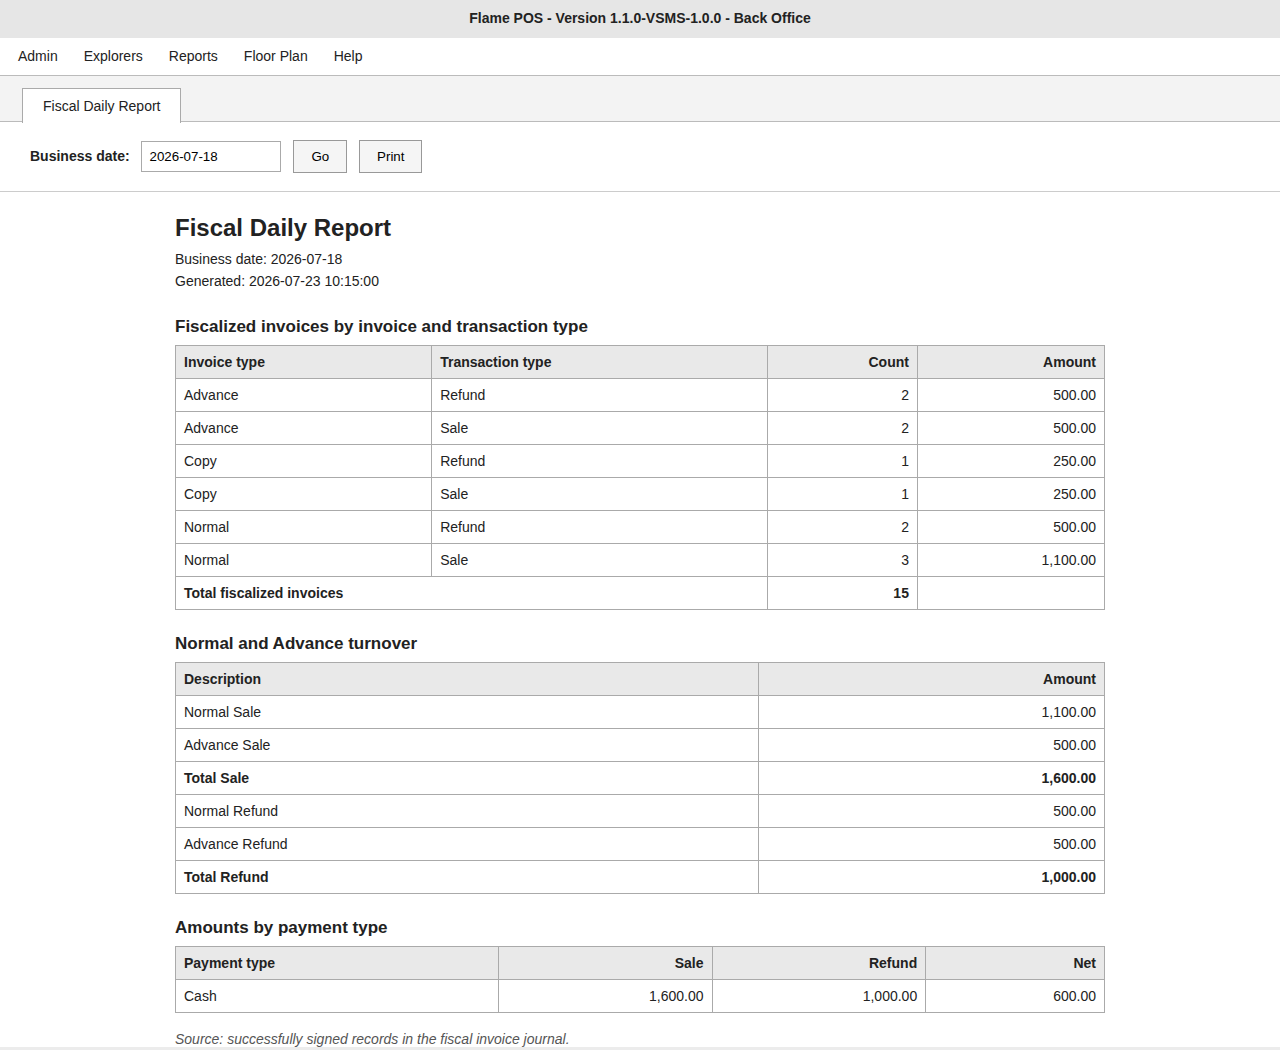
An authorized manager can create and print the fiscal daily report on request. The report is calculated from successfully signed records in the FlamePOS fiscal invoice journal; an invoice that did not receive a successful SDC response is not included.
- Open Back Office using an authorized manager account.
- Select Reports > Fiscal Daily Report.
- In Business date, select the calendar date to report.
- Select Go. FlamePOS reads all successfully signed fiscal invoices recorded for that date.
- Review Fiscalized invoices by invoice and transaction type. This table gives the number of invoices and amount for every invoice/transaction combination present, including Normal, Advance, Proforma, Copy, and Training Sale or Refund documents.
- Review Normal and Advance turnover. This section gives Normal Sale, Advance Sale, total sale, Normal Refund, Advance Refund, and total refund amounts.
- Review Amounts by payment type. For each TaxCore payment type used during the day, the report gives Sale, Refund, and Net amounts.
- Select Print when a paper or PDF copy is required.
Copy, Proforma, and Training invoices are included in invoice counts but do not change turnover or payment totals.
Payment totals are derived from the TaxCore Payment entries stored with successful Normal and Advance
Sale or Refund requests.
12. End of Shift
12.1 Installing an update
Where an update has been published, FlamePOS offers it once when it starts. Installing one is safe to do between sales, but it is best done outside trading hours.
- Finish and settle any open ticket. An update never interrupts a sale, but a till that is restarting cannot take one.
- Choose to install the update. FlamePOS fetches it and checks the vendor's signature before anything is changed.
- On Windows, FlamePOS says that it will close and start again by itself, then does so. This is expected. The application closes, the update is applied while it is closed - which is the only time the file can be replaced - and it starts again on its own. A message stays on the screen throughout.
- Wait. This usually takes less than a minute and can take two. Do not switch the till off and do not start FlamePOS by hand while the message is showing.
- When FlamePOS returns, confirm the build shown in the title bar or under About has changed.
On Linux the file is replaced underneath the running till, so there is no gap and no such message.
1.1.0-VSMS-1.0.0
is half of the POS number sent to the revenue office and does not move; what changes is
the build behind it, which is shown beside the version.
- Close or settle all open tickets according to business procedures.
- Run Reports > Fiscal Daily Report for the business date and review invoice counts, sale and refund totals, and amounts by payment type.
- Run any additional drawer or shift reports required by business policy.
- Count cash drawer balances and record differences according to store policy.
- Log out of FlamePOS.
13. Error Handling
13.1 A product that cannot be sold
Payment stops with "Tax rate 0.0% has multiple active V-SDC labels and requires an SDC-linked tax category" when the product on the ticket has no tax category at all. A product with no category has no rate to declare, and where more than one zero-rated label is active on the SDC, nothing can choose between them.
This is a configuration fault, not a till fault. An administrator opens Back Office → Products → Products Input, finds the product, and gives it a tax category. Products added since this version cannot be saved without one; a product created before it can still be missing one.
13.2 Two products with the same barcode
Where a scanned barcode is recorded against more than one product, FlamePOS does not guess. The matching products are listed under the search box and the operator chooses the intended one. A barcode that matches exactly one product is added straight to the ticket.
| Error | User Action |
|---|---|
| Printer unavailable | Check printer power, paper, network/USB connection, and configured printer name. Reprint only if authorized. |
| Selected SDC unavailable | Notify supervisor or administrator. The sale is not finalized as a fiscal receipt unless a valid response is received and stored. Do not switch signers merely to retry an uncertain invoice. |
| Active SDC tax rate unavailable or mismatched | Do not complete the fiscal sale. Ask an administrator to verify the selected SDC connection and PLU tax assignment. FlamePOS does not substitute a local default fiscal label. |
| Payment amount incorrect | Cancel before confirmation where possible. If already fiscalized, use the authorized refund/correction process. |
| User permission denied | Ask an authorized supervisor to perform or approve the restricted action. |